Getting started
This page takes you from “I just signed up” to “my dashboard has data” in about 5 minutes. No technical background assumed.
About Voris
Voris is a privacy-native website analytics and AI-visibility platform. You add one lightweight <script> tag to your website, and Voris shows you how your site performs and how AI assistants (such as ChatGPT, Claude, Gemini, and Perplexity) discover, read, and cite your pages.
With Voris you can:
- See real-time traffic and Core Web Vitals for your site, with no cookies and no cross-site visitor tracking.
- Track your AI visibility — how often AI assistants reference your content and which pages they cite.
- Invite teammates to a shared organization and share read-only dashboards.
Voris is operated from the EU and your analytics data is stored in the EU.
Signing in and how we use your Google account
You can sign in to Voris with a one-click email magic link, or with your Google account by clicking Continue with Google.
When you choose Continue with Google, Voris uses Google only to confirm your identity and create your account. Google sends us the standard sign-in scopes (openid profile email). From what Google returns, Voris stores only your name, your email address, and an opaque account identifier that Google assigns — used solely to sign you in and identify you inside your organization. Google also returns a profile picture, but Voris does not store or display it.
Connecting Google Search Console (optional)
If you want richer search insights, you can optionally connect your Google Search Console account to the Voris Signal Engine. When you do, Voris requests read-only access to your Search Console data (the webmasters.readonly scope).
We use this access for one purpose: to read your site’s search-performance data — the queries, pages, clicks, impressions, and position data Search Console reports — and correlate it against your analytics traffic so you can see what search activity coincided with changes in your traffic. Voris only reads this data; we never modify, add, or remove anything in your Search Console account.
Connecting Search Console is entirely optional — you can use Voris without it, and you can disconnect it at any time from your site settings. For the full walkthrough, see Connecting Google Search Console.
Across both Google sign-in and Search Console, Voris does not read your Gmail, your Google Drive, or your contacts, we never sell your Google data, and we never use it for advertising. For full details, see our Privacy Policy and Terms of Service .
1. Sign in with a magic link
Voris does not use passwords. You type in your email, we send you a one-click link, you click it, and you are signed in. That is it.
- Open the sign-in page.
- Enter your email in the Email address field.
- Click Send magic link.
- Check your email. The sender will be
noreply@voris.ai. The subject line mentions signing in to Voris. - Click the link in the email. It expires after 10 minutes. It is single-use.
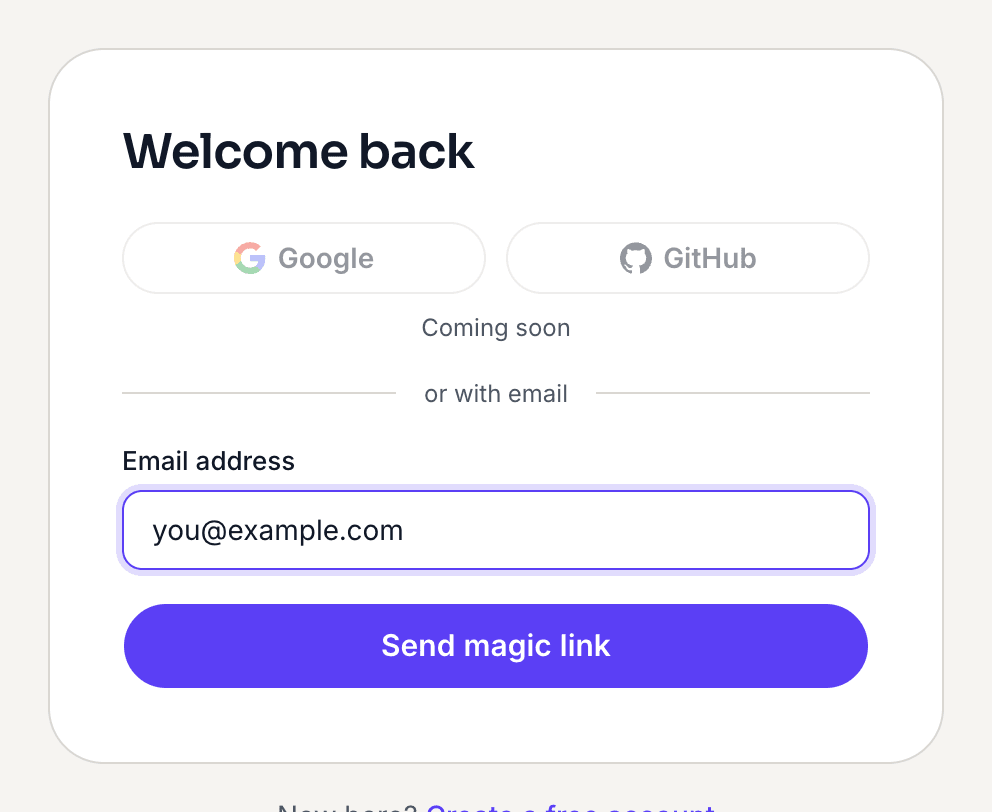 Magic link sign in
If the email does not arrive within a minute, check your spam folder first. If it is still missing, see Troubleshooting.
You can also click Continue with Google for one-click access. Voris stores only your name, email address, and an opaque Google account identifier — never your Google profile picture — see Signing in and how we use your Google account above.
2. Create your organization
The first time you sign in, we ask for an organization name. An organization is the home for your team, your sites, and your settings. If you are a solo founder, just use your own company name here. If you are setting this up for a client, use the client’s name.
- You will see the Create your organization screen.
- Type a name in Organization name (for example, Acme Inc).
- Click Create organization.
You are automatically made the owner of this organization. You can invite team members any time — see Managing your team.
3. Add your first site
A “site” is one website or web app you want to track. Most people will only have one. You can create up to 10 sites in a single organization.
- On your dashboard home, click Add site.
- The wizard opens with four steps. Work through them one at a time.
Step 1 — Site details
- Site name: a friendly name you will recognize. For example, Acme marketing site.
- Domain: the website’s main domain, like
example.com. Do not includehttps://or a trailing slash.
Click Continue.
Step 2 — Privacy mode
The setup wizard lets you pick a privacy mode in step 2: Mode A (the default) or Mode B (available to switch on, on most accounts). Mode C is coming soon.
- Mode A — Aggregated — No cookies, no visitor tracking. Cookie-banner-free. This is the default, and for most sites this is all you need.
- Mode B — Balanced — Available. Selecting it here shows a short privacy disclosure (and a link to the DPIA guide) before you continue. You can also switch a site to Mode B later in Settings → Privacy & data.
- Mode C — First-party — Marked Coming soon.
Pick a mode and click Continue — choose Mode A if you’re not sure. If you want more detail on what each mode will give you, see Privacy modes explained.
Step 3 — Install the script
We give you a single <script> tag to copy. It looks something like this:
<script defer data-site-id="your-site-id" src="https://cdn.voris.ai/v1/vor.js"></script>The hostname (cdn.voris.ai in this example) may look different depending on your provider. Use whatever the wizard shows you, not what is printed here.
- Click Copy to clipboard.
- Paste the snippet into your website’s
<head>tag, before the closing</head>. - Publish or re-deploy your site.
For guidance on where the <head> tag lives in common platforms like Shopify, WordPress, or Webflow, see Installing tracking on your site.
When you are done, click I’ve installed the script.
Step 4 — Waiting for your first event
Voris now watches for the first pageview to arrive. This screen polls every couple of seconds and shows Listening for events…
- Open your website in a new tab. If possible, use an incognito window on a different device so ad blockers or dev-mode settings do not interfere.
- Load any page on your site.
- Wait a few seconds.
The wizard auto-advances as soon as it sees the first event. You land directly on your dashboard.
If nothing happens within about 3 minutes, the wizard offers troubleshooting tips:
- Make sure the script is in the
<head>tag, not the<body>. - Check that the domain you entered matches the site you are visiting.
- Try visiting a page on your site in an incognito window.
- Disable ad blockers temporarily for the test visit.
Click Resume checking to keep waiting, or see the more detailed Troubleshooting guide.
4. Look at your dashboard
Once the first event lands, you are taken to your site’s main dashboard. Give it a few minutes of real traffic before you judge it — analytics are most useful after at least a day of data.
Read Understanding your dashboard to learn what each card, chart, and panel means.
What to do next
- Invite a teammate — see Managing your team.
- Turn on Core Web Vitals to monitor your site’s loading speed — see Core Web Vitals.
- Share a read-only view of your dashboard with a client — see Sharing dashboards publicly.